


The classic bun is the epitome of timeless elegance and sophistication. It's a versatile hairstyle that can be adapted for any grand occasion, from a wedding to a formal gala. Its clean lines and sculpted shape convey a sense of refinement, making it a go-to choice for a polished and put-together look. Achieving that perfectly smooth, lustrous bun seen in editorial shoots is easier than you might think. With the right preparation and technique, you can create a stunning updo that will last all day and night. This guide will walk you through everything you need to know.
Preparing Your Hair for the Perfect Bun
The foundation of a great hairstyle is well-prepared hair. For a bun to hold its shape and have a smooth finish, it's best not to start with freshly washed, silky hair, as it can be too slippery. Ideally, work with hair that was washed the day before. If you must wash it on the same day, you'll need to add some texture and grip.
After washing and conditioning, apply a volumising mousse or a texturising spray from roots to ends while your hair is still damp. This will provide the necessary hold and body. Blow-dry your hair thoroughly, using a round brush to smooth it out if you're aiming for a sleek look. If your hair is naturally very straight, you might consider lightly curling the ends to make them easier to tuck into the bun. Before you begin styling, ensure your hair is completely dry and brushed through to remove any knots or tangles.
Step-by-Step Guide to Creating the Classic Bun
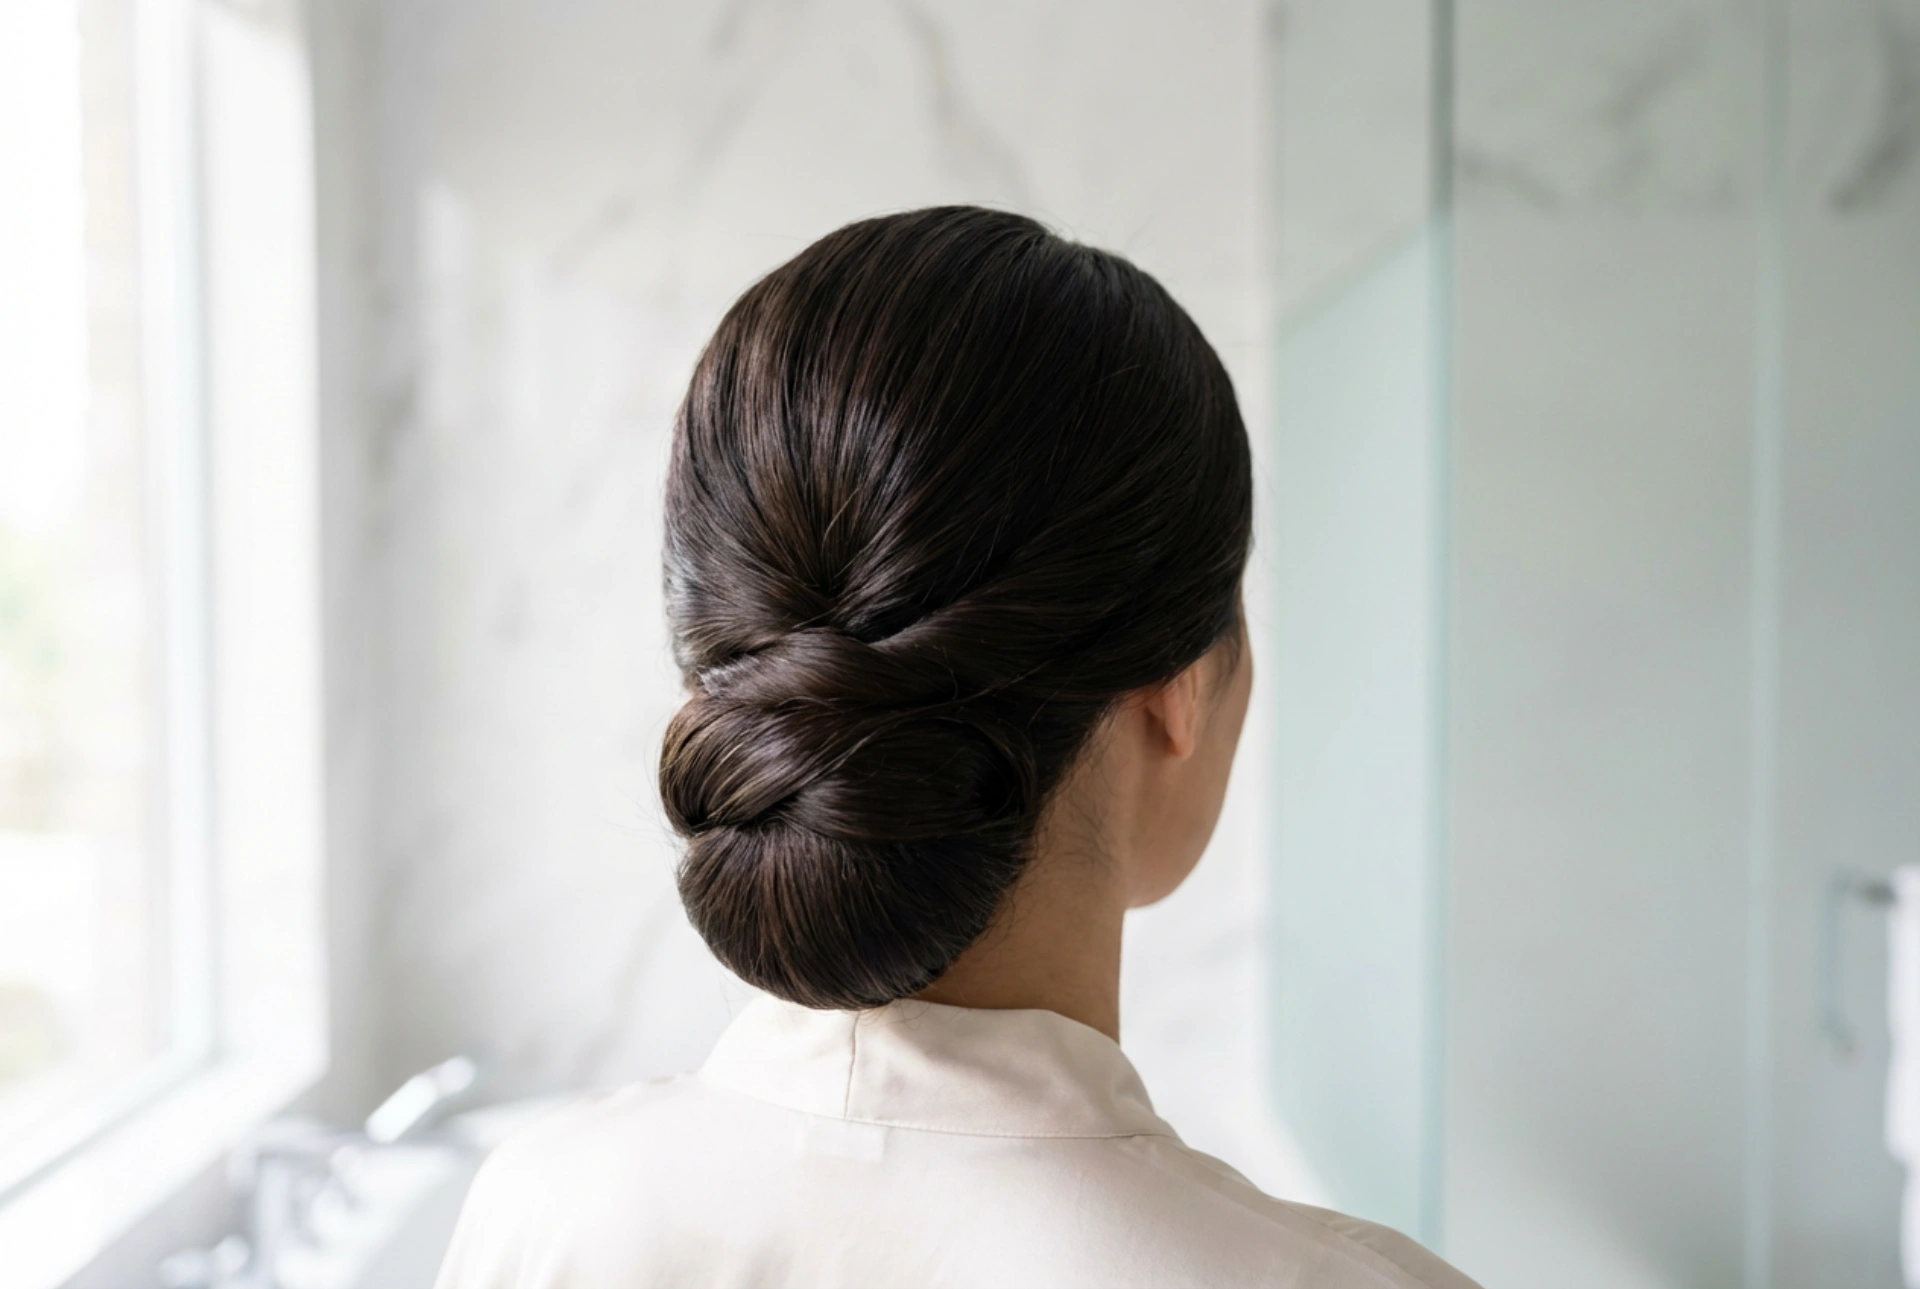
Follow these steps carefully to construct a flawless and secure bun. Have your tools ready: a hairbrush, a fine-toothed comb, strong hair elastics, and plenty of bobby pins that match your hair colour.
Step 1: Create the Ponytail
The placement of your ponytail determines the final position of your bun. For a classic, sophisticated look, a low ponytail at the nape of the neck is ideal. For a more modern or traditional ballerina style, a high ponytail on the crown of your head works beautifully. Brush your hair back smoothly, gathering it into a tight ponytail. Use the fine-toothed comb to eliminate any bumps or flyaways before securing it firmly with a hair elastic. For an extra sleek finish, you can wrap a small section of hair from the ponytail around the elastic and pin it underneath to hide it.
Step 2: Twist and Wrap
Once your ponytail is secure, lightly twist the length of the hair from the base to the ends. This helps to keep the strands together and creates a neater shape. Next, begin wrapping the twisted ponytail around the base of the elastic. Keep the wrap tight and flat against your head for a sleek bun, or a little looser for a softer, fuller look. As you wrap, guide the hair into a spiral shape, tucking the ends under the bun as you complete the circle.
Step 3: Secure the Bun
This is the most critical step for a long-lasting style. Holding the bun in place with one hand, use your other hand to insert bobby pins. The key is to anchor the bun to the base hair on your scalp. Insert the pin from the outer edge of the bun, catch a small section of the bun's hair, then angle the pin towards the centre of the bun's base, pushing it in to secure. Use a 'criss-cross' pattern with your pins for extra hold. Continue adding pins around the entire circumference of the bun until it feels completely stable. You should be able to gently shake your head without it loosening.
Step 4: The Finishing Touches
With the bun securely in place, it's time for the final polish. Use a light-hold hairspray to tame any remaining flyaways. For a super smooth finish, you can spray a small amount of hairspray onto a clean toothbrush or a spoolie and gently brush down any stray hairs around your hairline and the bun itself. For an extra touch of glamour, finish with a light mist of shine spray to give your hair a healthy, lustrous glow.
Variations on the Classic Bun
While the classic bun is beautiful on its own, you can easily customise it to suit your personal style or the specific occasion.
- The Sleek & Chic Bun: For an ultra-modern, high-fashion look, use a styling gel or pomade when slicking your hair back into the ponytail. Ensure the finished bun is very tight and smooth, with no flyaways in sight.
- The Textured & Romantic Bun: Before twisting your ponytail, gently backcomb it to add volume. After securing the bun, use your fingertips to gently pull at small sections of the bun to loosen it slightly, creating a softer, more romantic texture. You can also leave a few face-framing tendrils out at the front.
- Accessorising Your Bun: Elevate your style by adding accessories. A decorative comb, pearl-adorned pins, or even a delicate sprig of fresh flowers can be tucked into the side or base of the bun to complement your outfit.
Tips for a Long-Lasting Hold
To ensure your elegant creation stays put through hours of celebrating, keep these tips in mind. Starting with hair that isn't freshly washed provides natural grip. Using a good quality, strong-hold hairspray is non-negotiable. When pinning, make sure you are catching both the hair from the bun and the base hair on your head. A final, generous mist of finishing spray all over your head will set the style and provide a protective barrier against humidity. For very fine or slippery hair, a discreet hairnet that matches your hair colour can be a lifesaver, providing invisible but powerful support.


