


Achieving beautifully long and perfectly shaped nails is a desire for many beauty enthusiasts. Nail extension tips offer a fantastic and accessible way to instantly add length and create a durable canvas for your favourite colours and designs. Mastering the art of applying them at home can transform your manicure routine, giving you salon-quality results with a bit of practice. This guide will walk you through the entire process, from selecting the ideal tip shape to the final finishing touches for a seamless look.
Choosing the Perfect Nail Tip Shape
The first step in your nail extension journey is choosing a tip shape that complements your hands and suits your lifestyle. The variety available can be exciting, but it's important to make an informed choice.
Common Nail Tip Shapes
- Square: A classic shape with straight sides and a sharp, flat top. It looks particularly striking on longer nail beds.
- Oval: This elegant, traditional shape has softly curved sides that taper to a rounded tip, which can help make fingers appear more slender.
- Almond: A sophisticated shape that is slim on the sides and wide at the base, coming to a rounded peak. It's a popular choice for a modern, graceful look.
- Coffin/Ballerina: Similar to an almond shape but with a squared-off tip, resembling a coffin or a ballerina's slipper. This bold style is a favourite for long nail enthusiasts.
- Stiletto: A dramatic shape with a sharp, pointed tip. It offers a very bold statement but may be less practical for everyday activities.
When selecting a shape, consider your natural nail bed and finger length. Softer, rounded shapes like oval and almond tend to be universally flattering. Also, think about your daily routine; if you work with your hands a lot, a shorter, more rounded shape might be more durable and comfortable than a long, pointed stiletto.
Preparing Your Natural Nails for Application
Proper preparation is the most critical step for ensuring your nail extensions last and look flawless. Skipping this stage can lead to lifting and a less professional finish. The goal is to create a clean, dry, and slightly textured surface for the adhesive to bond to securely.
- Clean the Nails: Start by washing your hands and ensuring your nails are completely free of any polish, oils, or lotions.
- Manage Cuticles: Gently push back your cuticles using a cuticle pusher. Avoid cutting them, as this can create an entry point for irritation. The nail plate should be clear of any non-living tissue.
- Buff the Nail Plate: Using a fine-grit buffer, lightly buff the surface of your natural nails. The aim is to remove the natural shine, not to thin the nail. This creates a slightly rough texture that helps the adhesive grip better.
- Dehydrate and Cleanse: Wipe each nail with a lint-free pad soaked in a nail dehydrator or isopropyl alcohol. This removes any remaining dust and oils, ensuring the best possible adhesion.
The Art of Applying Nail Tips
With your nails prepped, you are ready to apply the tips. This process requires precision and patience. Work on one nail at a time to ensure each tip is placed perfectly.
Sizing the Tip
Select a nail tip for each finger. The correct size should fit perfectly from one sidewall of your natural nail to the other without any gaps or overlap. If a tip is slightly too wide, you can gently file its sides for a custom fit. It's better to file down a larger tip than to use one that's too small, as a small tip can put pressure on the natural nail.
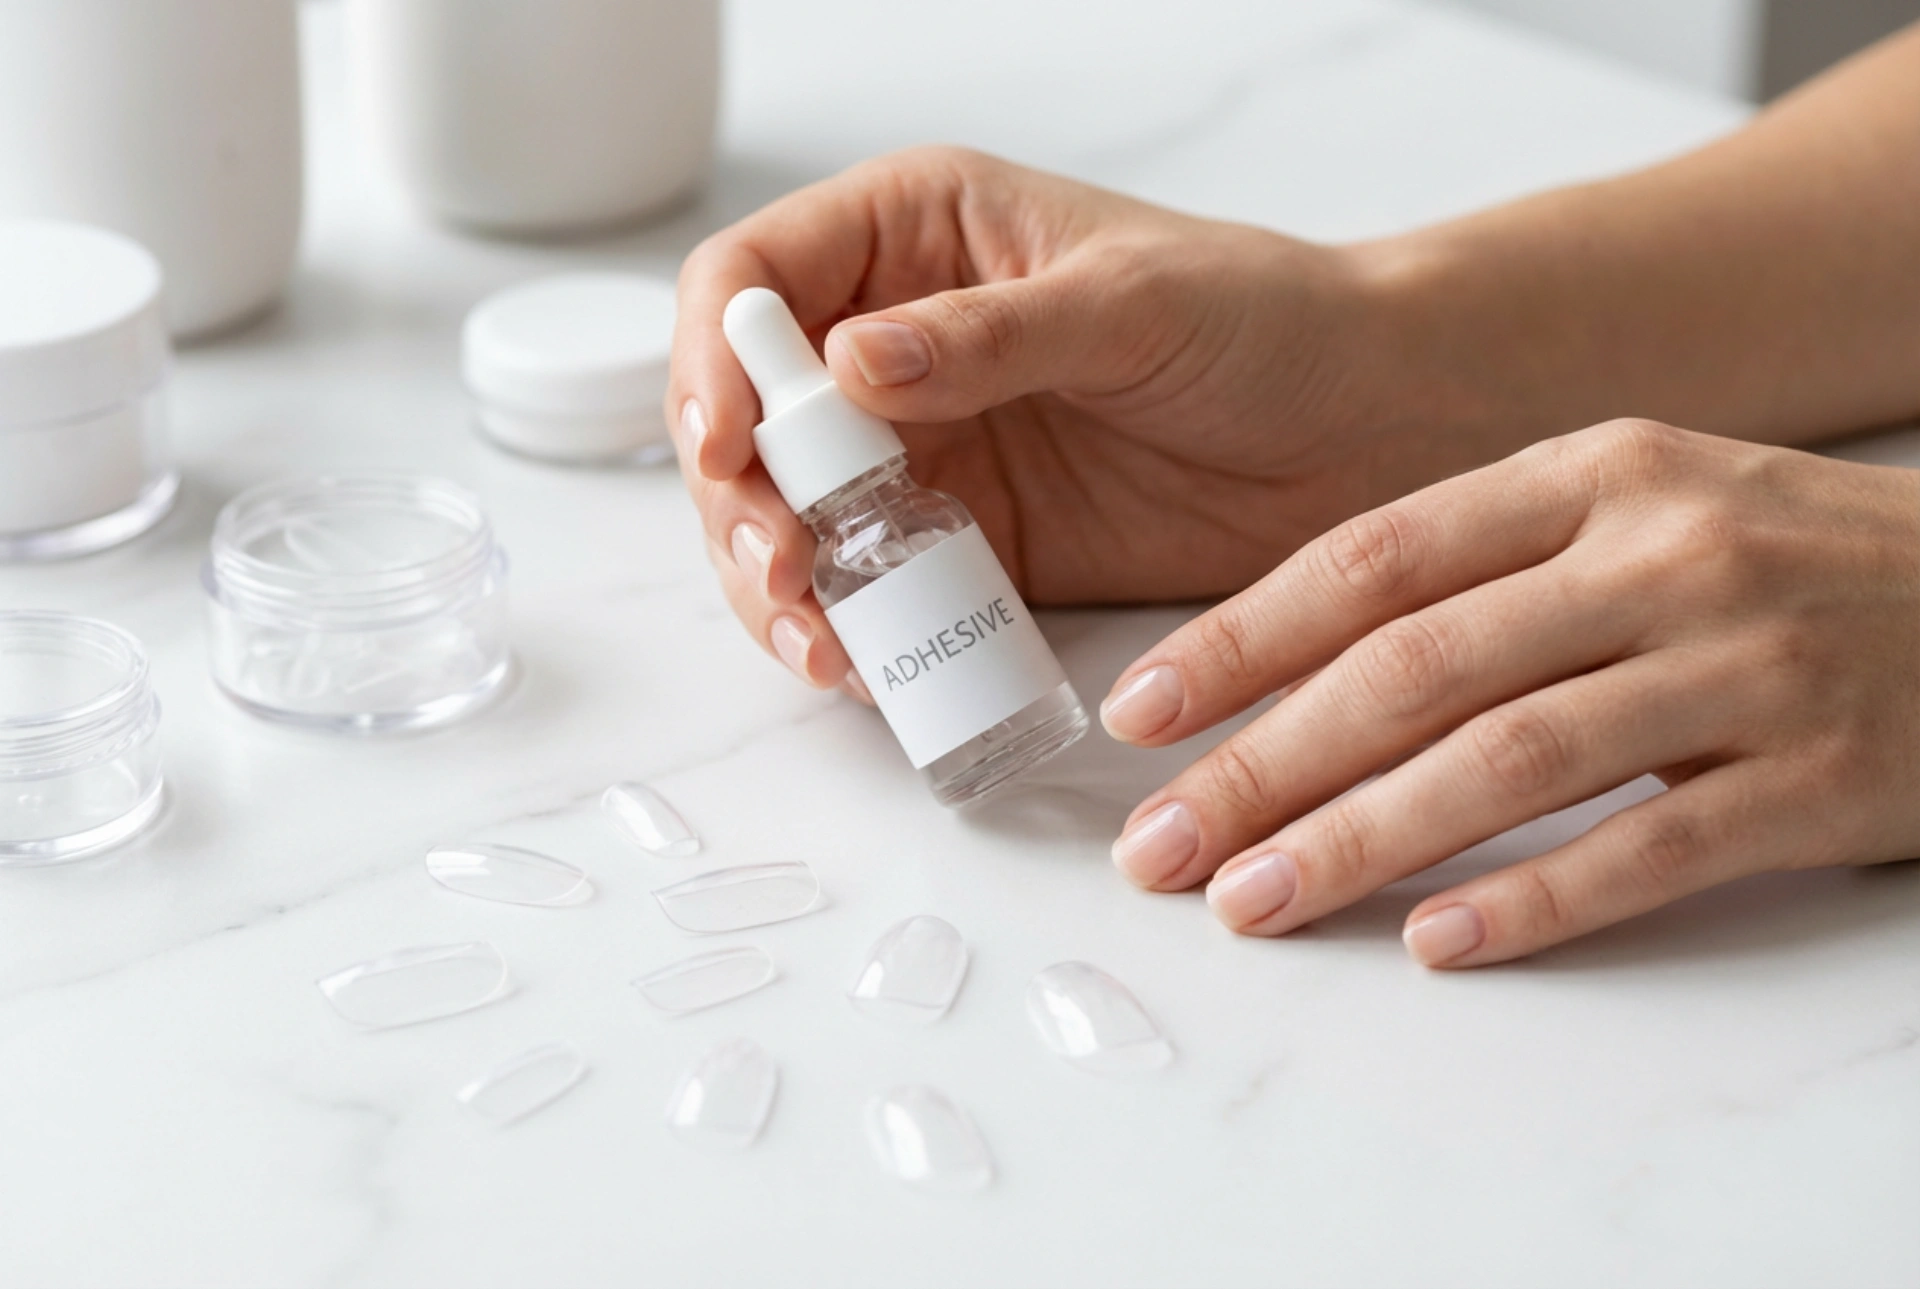
Adhesive Application and Placement
Apply a small drop of a quality nail adhesive into the well (the indented part) of the nail tip. Avoid using too much, as it can spill out onto the skin. Hold the tip at a 45-degree angle to the free edge of your natural nail. Slowly lower the tip onto the nail plate, pressing down firmly to push out any air bubbles. The adhesive should spread evenly underneath the tip. Hold it in place for 10-15 seconds until the bond is secure. Check for air bubbles; if you see any, it's best to remove the tip and reapply to prevent lifting later.
Blending and Shaping for a Seamless Look
Once all the tips are securely attached, the final stage is to blend and shape them into a natural-looking extension of your own nails.
Trimming and Filing
Using a tip cutter, trim the extensions to your desired length. It's always wise to cut them a little longer than you want, as you will lose some length during filing. Next, use a nail file to perfect the shape, whether you're refining the curves of an almond tip or sharpening the edges of a square one. Ensure all nails are uniform in length and shape.
Blending the Seam
The most important step for a professional finish is blending the seam where the artificial tip meets your natural nail. Use a fine-grit file or a buffer to gently file down the edge of the tip. The goal is to create a smooth, invisible transition. Be very careful not to file your natural nail plate excessively. The surface should feel completely smooth when you run your finger over it.
Final Buffing
After blending, lightly buff the entire surface of the extension. This removes any file marks and prepares the nail for the application of gel, acrylic, or a simple base coat and polish. Wipe away all the dust with a brush or a cleanser-soaked pad before proceeding with the rest of your manicure. With these steps, you'll have a strong and beautiful foundation for any nail art you can imagine.


