


Artificial toenails offer a fantastic way to achieve a flawless, long-lasting pedicure in minutes, perfect for special occasions or when you simply want your feet to look their best. While they provide an instant confidence boost, the key to using them without compromising the health of your natural nails lies in proper technique. Applying and removing them correctly is not difficult, but it does require patience and a gentle touch. This guide will walk you through the essential steps for a safe and beautiful at-home pedicure experience.
The Foundation: Preparing Your Natural Nails
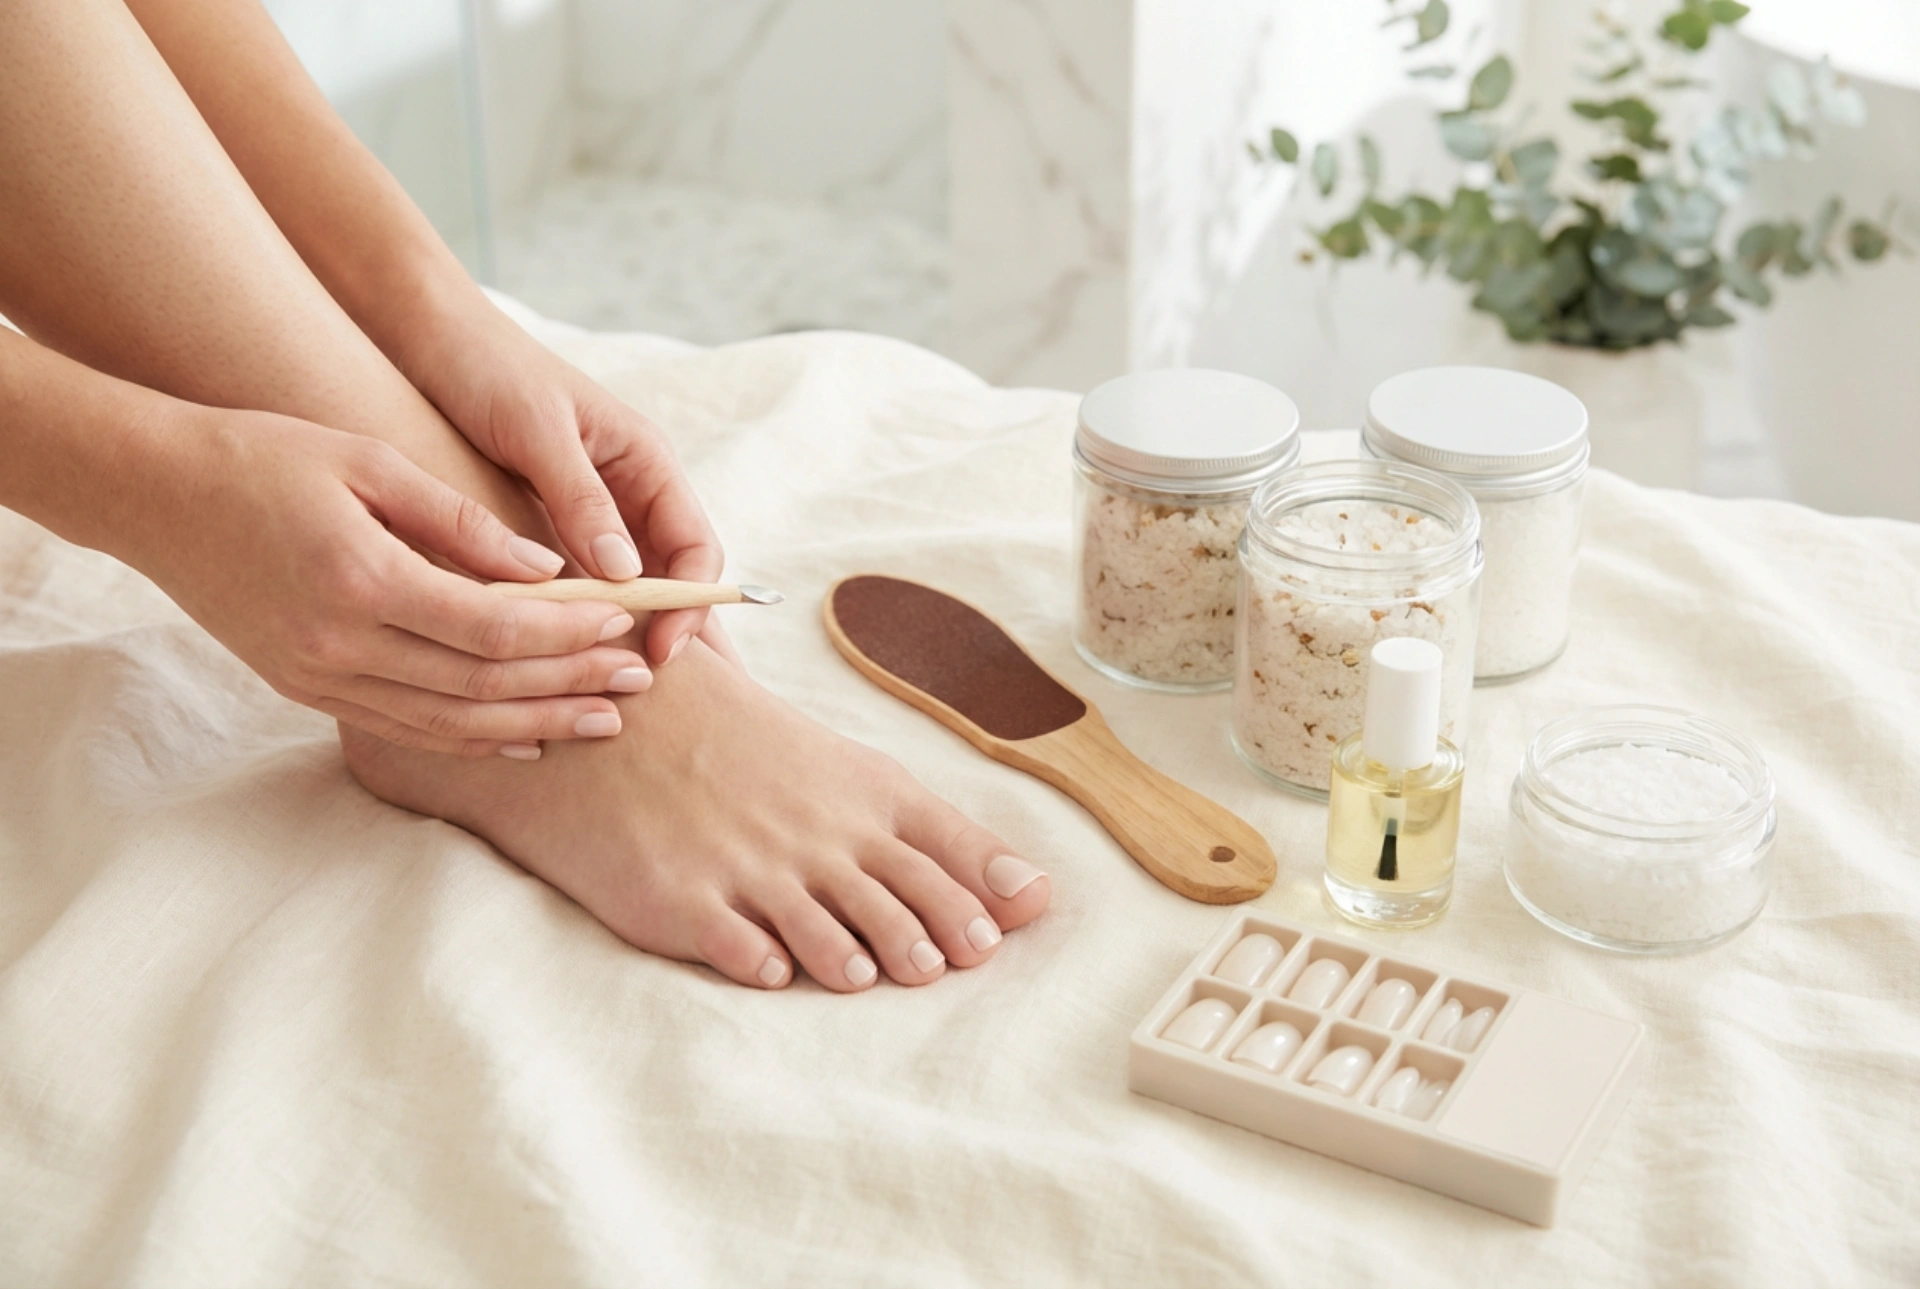
Proper preparation is the most critical step for ensuring your artificial toenails adhere well and last longer. Skipping this stage can lead to them popping off prematurely and can trap dirt and moisture. Think of it as creating the perfect canvas for your art.
- Start with a Clean Slate: Begin by removing any old nail varnish. Wash your feet thoroughly with soap and water, paying special attention to the nail area, and then dry them completely.
- Tend to Your Cuticles: Gently push back your cuticles using a wooden or rubber-tipped cuticle pusher. This creates a clean base for the artificial nail and prevents it from lifting at the edge. Avoid cutting your cuticles at home, as this can lead to irritation.
- Shape and Smooth: Trim your natural toenails so they are short and neat. Gently file any rough edges to ensure they don’t peek out from under the artificial nail.
- Lightly Buff the Surface: Using a fine-grit nail buffer, lightly buff the entire surface of each natural toenail. The goal is to remove the natural shine and oils, which creates a slightly rougher texture for the adhesive to grip onto. Be gentle—you are not trying to thin the nail.
- Dehydrate the Nail Plate: To ensure a perfectly oil-free surface, wipe each nail with a lint-free pad soaked in rubbing alcohol. This final cleanse removes any remaining dust and moisture, guaranteeing optimal adhesion.
The Perfect Fit: How to Apply Artificial Toenails Correctly
With your nails prepped and ready, the application process can begin. Taking a few moments to get the sizing and placement right will make all the difference in the final look and feel.
Step 1: Sizing Up
Before you even think about adhesive, find the correct artificial nail size for each of your toenails. A correctly sized nail should fit comfortably over your entire natural nail bed, from one side wall to the other, without overlapping onto the skin. If a nail is too wide, it will look unnatural and lift easily. If it's too narrow, it can put pressure on your natural nail. Lay out the chosen nails in order for each foot to streamline the application process.
Step 2: Applying the Adhesive
You have two main options for adhesion: glue or adhesive tabs. Nail glue provides a stronger, longer-lasting bond (typically 1-2 weeks), while adhesive tabs are better for short-term wear (1-3 days) and allow for easier removal. Apply a small, even layer of your chosen adhesive. If using glue, place one small drop on your natural nail and one on the back of the artificial nail. Be careful not to use too much, as it can seep out and bond to your skin.
Step 3: Press and Hold
Align the artificial nail with your cuticle line and press it down firmly onto your natural nail. Start by applying pressure at the base and then move towards the tip. This helps to eliminate any air bubbles. Hold the nail in place with firm, even pressure for at least 20-30 seconds to ensure a secure bond. Once all the nails are applied, it's crucial to avoid contact with water for at least an hour to allow the adhesive to cure completely.
Safe and Gentle Removal
When it's time to take the nails off, resist the urge to pull or rip them. Forceful removal is the number one cause of damage to the natural nail plate. Patience is your best friend during this process.
- Soak Your Feet: Fill a bowl with warm, soapy water. Adding a few drops of cuticle oil or body oil can help to break down the adhesive faster. Soak your feet for at least 15-20 minutes. The warmer the water (without being uncomfortable), the more effective the soak will be.
- Gently Test the Edges: After soaking, use the flat end of a wooden manicure stick to gently probe the side edges of an artificial nail. If the adhesive has loosened, you will be able to gently slide the stick underneath and lift the nail off with minimal resistance.
- If It's Stubborn, Re-Soak: If the nail doesn't lift easily, do not force it. This means the glue is still holding strong. Simply return your foot to the warm water and soak for another 10-15 minutes before trying again.
- Clean Up Residue: Once all the nails are off, you may have some sticky residue left on your natural nails. You can remove this by gently buffing the surface with a soft buffer or by rubbing it with a cotton pad soaked in a little oil.
Aftercare and Common Mistakes to Avoid
Proper aftercare will ensure your natural nails remain healthy and strong. Immediately after removal, wash your hands and feet and apply a generous amount of nourishing cuticle oil to the nails and surrounding skin. Follow up with a good quality foot cream to rehydrate the skin. It’s also a good idea to give your nails a break for a few days before applying a new set. Avoid these common mistakes for the best results: using oversized nails, applying too much glue, skipping the vital prep stage, and wearing the nails for longer than recommended, which can trap moisture.


